Idle Pixel Maids Creator Guide
0.5.1Idle Pixel Maids Character Creator Kit

Make your own character

Bring a character you made into the café and watch her work. When she’s ready, share her on the Steam Workshop so other players can enjoy her for free. Just follow the pictures, one step at a time.

Read the guide
Windows only · One ZIP file (35 MB) · Free
A character previewed in the creator kit
Prepare

Get a 3D character model (FBX) and a face picture ready.

Create

Open the kit in Unity and fill in the fields.

Share

Try her in your game, then upload to the Workshop.

0Before you start

What you need

These files and a little writing are all you need. The Required items are enough to make a character; you can add the rest later.

What you need
Required

3D character model

One .fbx file
A human-shaped model with head, arm and leg bones. Up to 200,000 vertices
Required

Model textures

.png or .jpg (they can be inside the FBX)
Up to 4096 pixels per side
Required

Face picture

One .png
Square, up to 1024×1024. 1 MB or less to upload to the Workshop
Required

Name · personality · job

Text
Name 1–64 characters, creator name 1–80, personality and speaking style 1–12,000
Nice to have (you can add these later)
Optional

Motions

Animation .fbx
Six slots such as walking and working. Empty slots use the game’s default motions
Optional

Proactive messages and photos

Text + .png
Up to 30. Each photo up to 1024×1024 and 4 MB
Optional

Head accessory

One 3D model
A static model without bones (a ribbon, a hat…)
TipNo FBX yet? You can make one in a 3D program such as Blender. If your model has no bones, upload it to Mixamo (free Adobe account) with Upload Character, place the circles on the chin, wrists, elbows, knees and groin, then choose Download → Format: FBX, With Skin.

In this guide, we’ll use Unity-chan as the example. Please use a model you made yourself or have the rights to use.

1/ 12

Install Unity

You only need Unity to make characters. Players who use finished characters don’t need it.

  1. Download, install and open Unity Hub.
  2. Sign in with a Unity account. If you don’t have one, you can create it for free. Choose the Personal license.
  3. Press the Install Unity 6000.3.12f1 button below. Unity Hub opens the install screen. You don’t need any extra modules. Press Install and wait until it finishes.
ImportantThe version must be exactly 6000.3.12f1. The game won’t accept characters made with any other version. If button ② doesn’t work, find 6000.3.12f1 on the Unity download archive and press Install with Unity Hub.
2/ 12

Download and open the kit

  1. Press the Download the creator kit button at the top.
  2. Right-click the ZIP and choose Extract All…. A short path such as your Desktop works best.
  3. In the extracted folder, double-click OpenCreator.bat. If a Windows protection window appears, press More info → Run anyway.
  4. The first launch can take a few minutes while Unity sets things up. When you see a screen like this, you’re in.
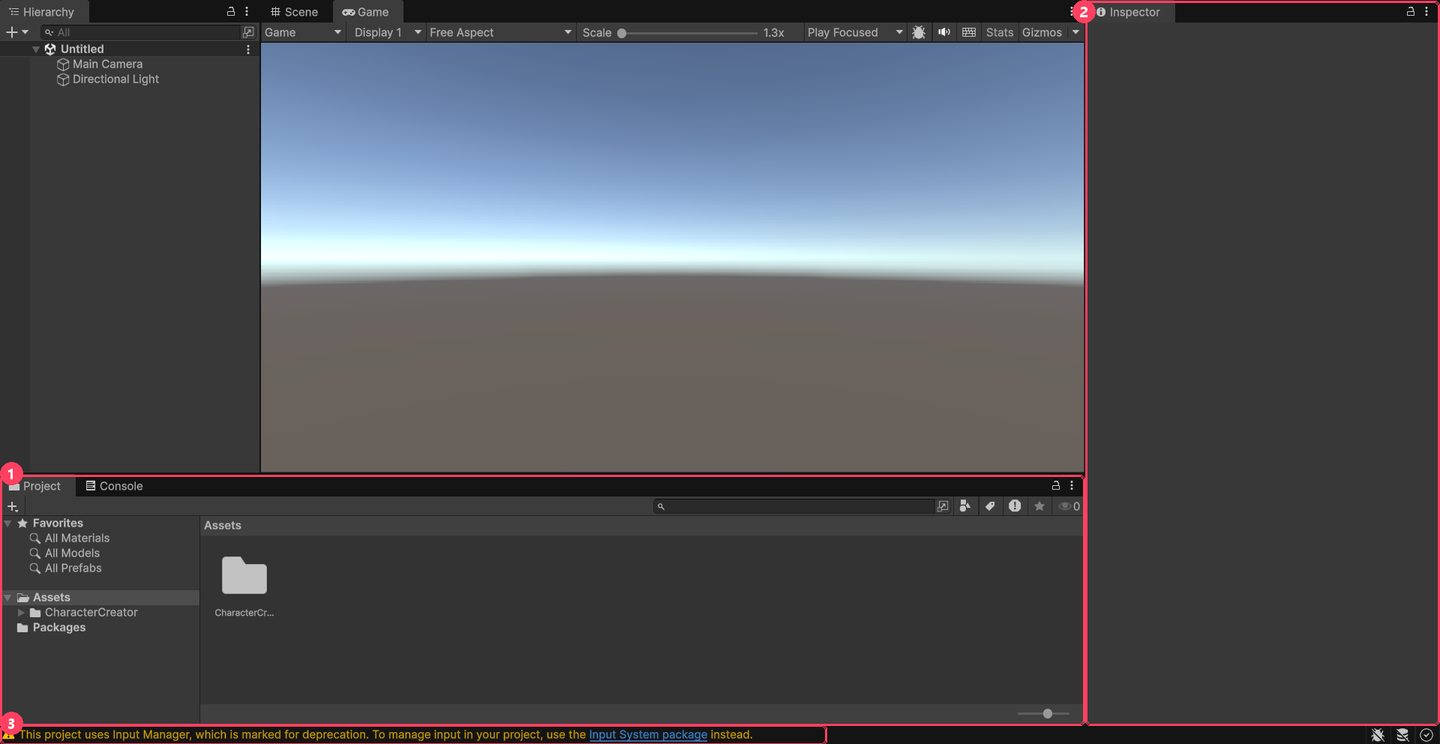
Unity right after opening the kit
1 Project window: where you add and pick files · 2 Inspector window: shows the settings of the selected file · 3 You can ignore the yellow warning line.
TipIf you see “Unity 6000.3.12f1 was not found”, step 1 isn’t finished. Check that 6000.3.12f1 appears under Installs in Unity Hub.
3/ 12

Make a folder for your character

Right-click Assets on the left of the Project window, choose Create → Folder, and rename it to MyCharacter.
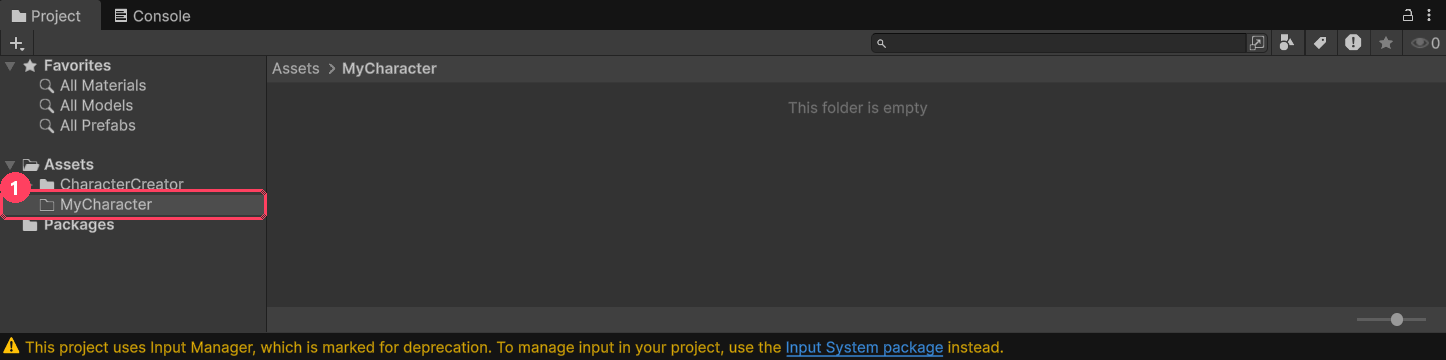
Project window with the new MyCharacter folder
1 The MyCharacter folder appears. The right side is still empty.
4/ 12

Add your files

Drag your files from Windows File Explorer into the MyCharacter folder (the empty area on the right). Add the character FBX and face PNG, plus any texture images, motion FBX files and message photos you have.
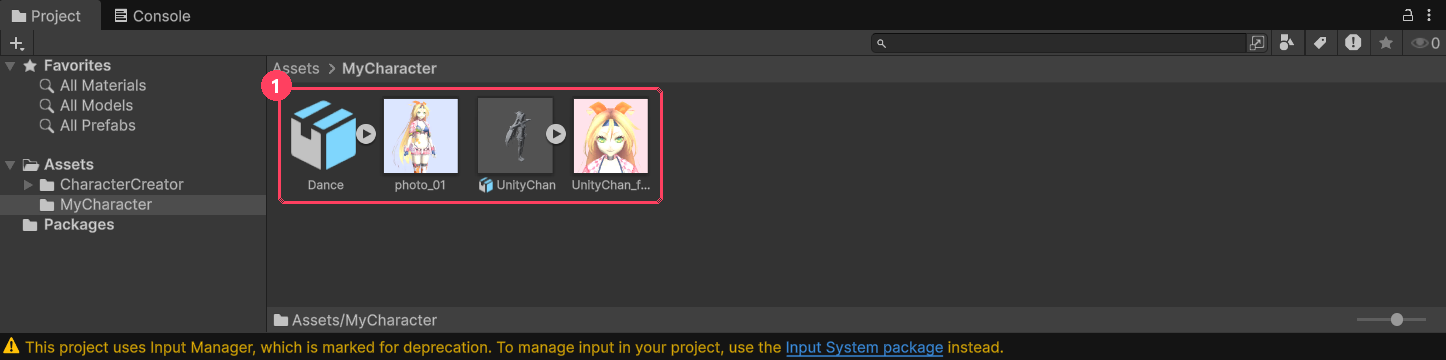
Four files inside the MyCharacter folder
1 Example: message photo photo_01, character UnityChan (FBX), face UnityChan_face, dance motion Dance (FBX)
5/ 12

Extract the textures

If the textures are packed inside the FBX (FBX files from Mixamo usually are), you must do this step. If you skip it, your character will look white in the game.
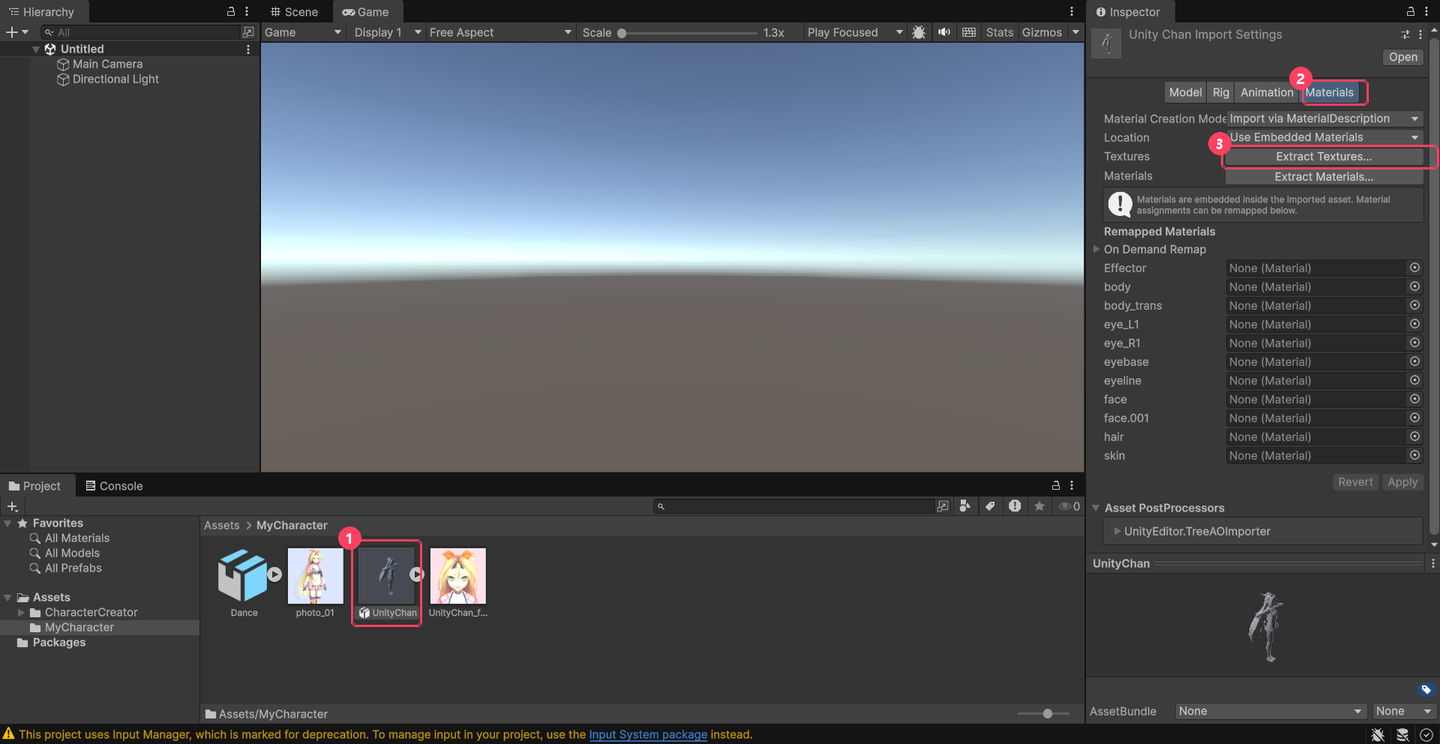
The Extract Textures button on the Materials tab
1 Click the character FBX once → 2 the Materials tab in the Inspector → 3 click Extract Textures... → when the folder window opens, keep the MyCharacter folder and press Select Folder
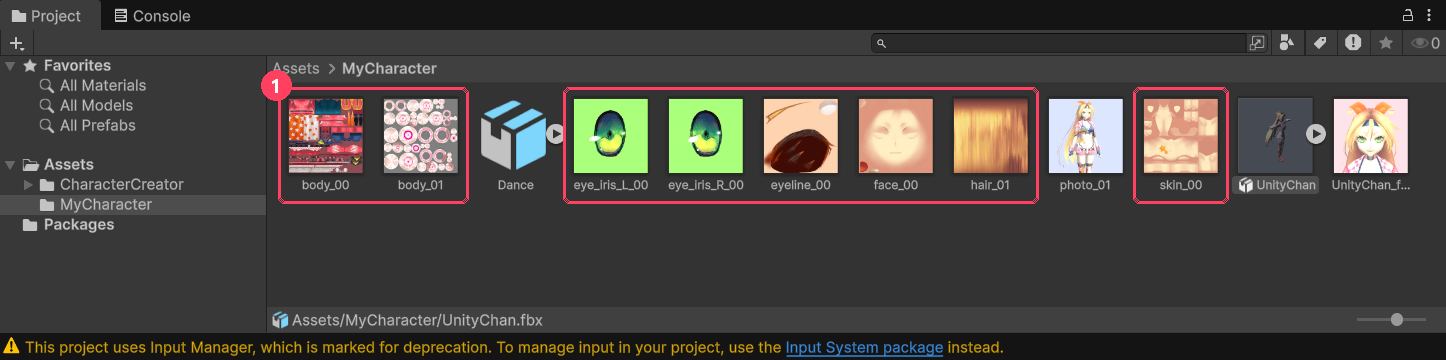
Extracted texture images in the folder
1 When the texture images appear in the folder, it worked.
TipIf you can’t press Extract Textures..., the FBX has no textures inside. In that case, just put the texture image files in the same folder as the FBX.
6/ 12

Open the creator window

In Unity’s top menu, choose Idle Pixel Girls → Character Creator.
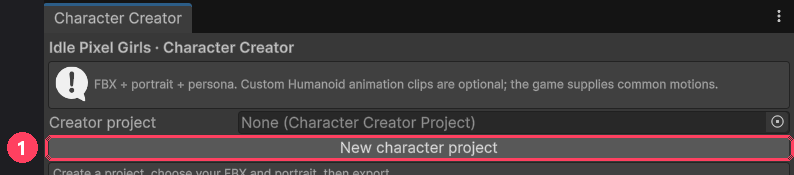
The Character Creator window when first opened
1 Press New character project. When the save window opens, save it in the MyCharacter folder with any name (for example MyMaid). Your work is kept in this file.
7/ 12

Add the model and set up the bones

The Model FBX field and the Prepare button
1 Drag the character FBX from the Project window into the Model FBX / prefab field → 2 press Prepare selected FBX as Humanoid once

Let’s check that it worked. Click the character FBX and look at the Inspector.
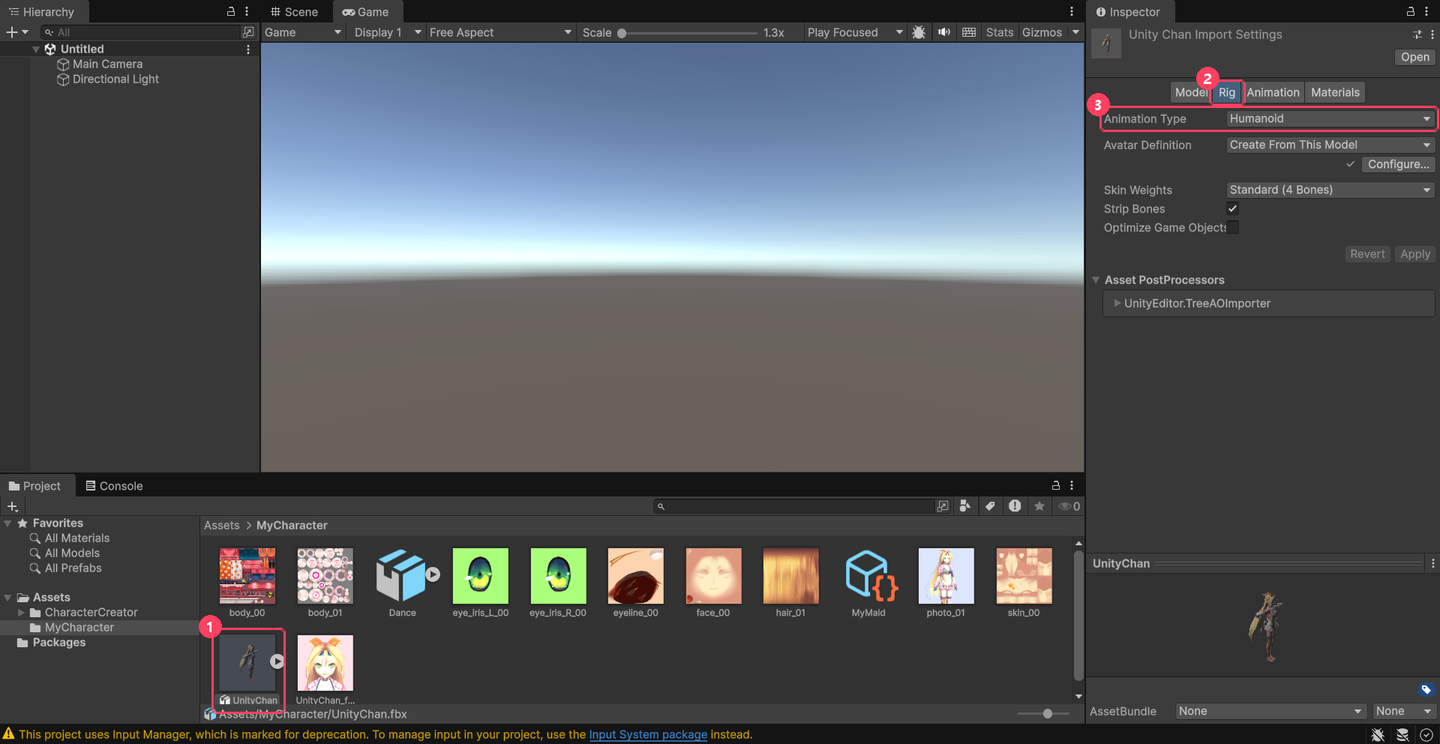
Rig tab with Animation Type set to Humanoid
1 Click the character FBX → 2 the Rig tab → 3 if Animation Type is Humanoid and there’s a ✓ next to Configure..., you’re done
TipIf you see a warning instead of ✓, press Configure... and connect the bones shown in red yourself. If that’s hard, see If you get stuck.
8/ 12

Fill in the character info

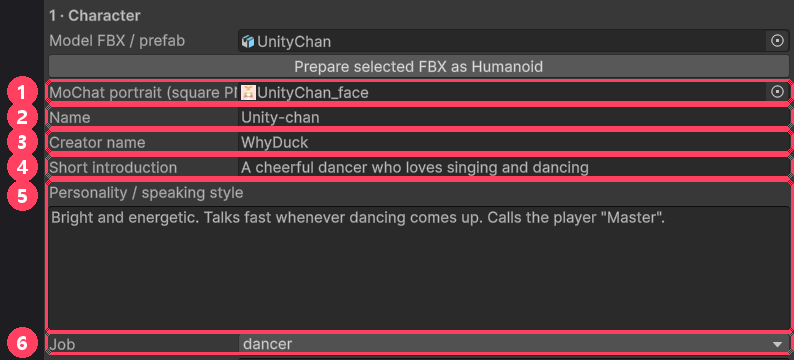
Face picture, name, personality and job fields
1 MoChat portrait: drag in the face PNG
2 Name: the character’s name
3 Creator name: your nickname
4 Short introduction: a one-line intro
5 Personality / speaking style: how she thinks and talks. She’ll chat this way in the game.
6 Job: server · barista · baker · chef · dancer
TipPersonality example: “Shy, but can’t stop talking once coffee comes up. Speaks casually and is scared of cats.” Don’t include real chat logs or personal information. Keep Height between 0.8 and 2.2 m.
9/ 12Optional

Add motions and proactive messages

You can skip this. Empty slots use the game’s default motions, and without messages she simply chats.
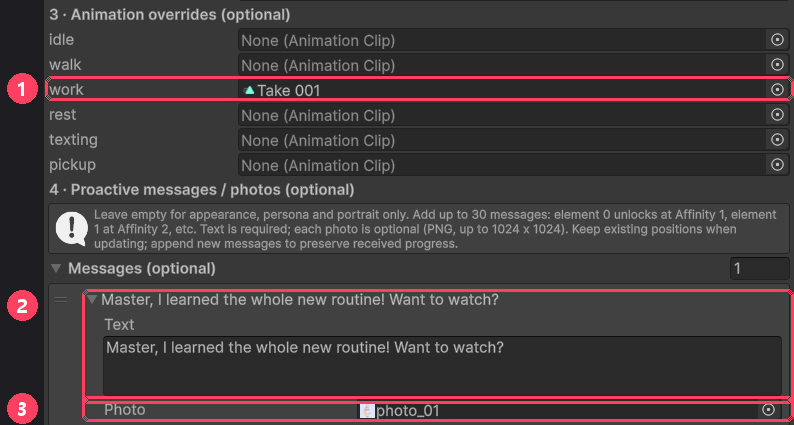
Motion slots and the message list
1 Drag motion FBX files into the slots you want (idle standing, walk, work, rest, texting on the phone, pickup items) · 2 press + under Messages and write a message · 3 to attach a photo, put a PNG in the Photo field
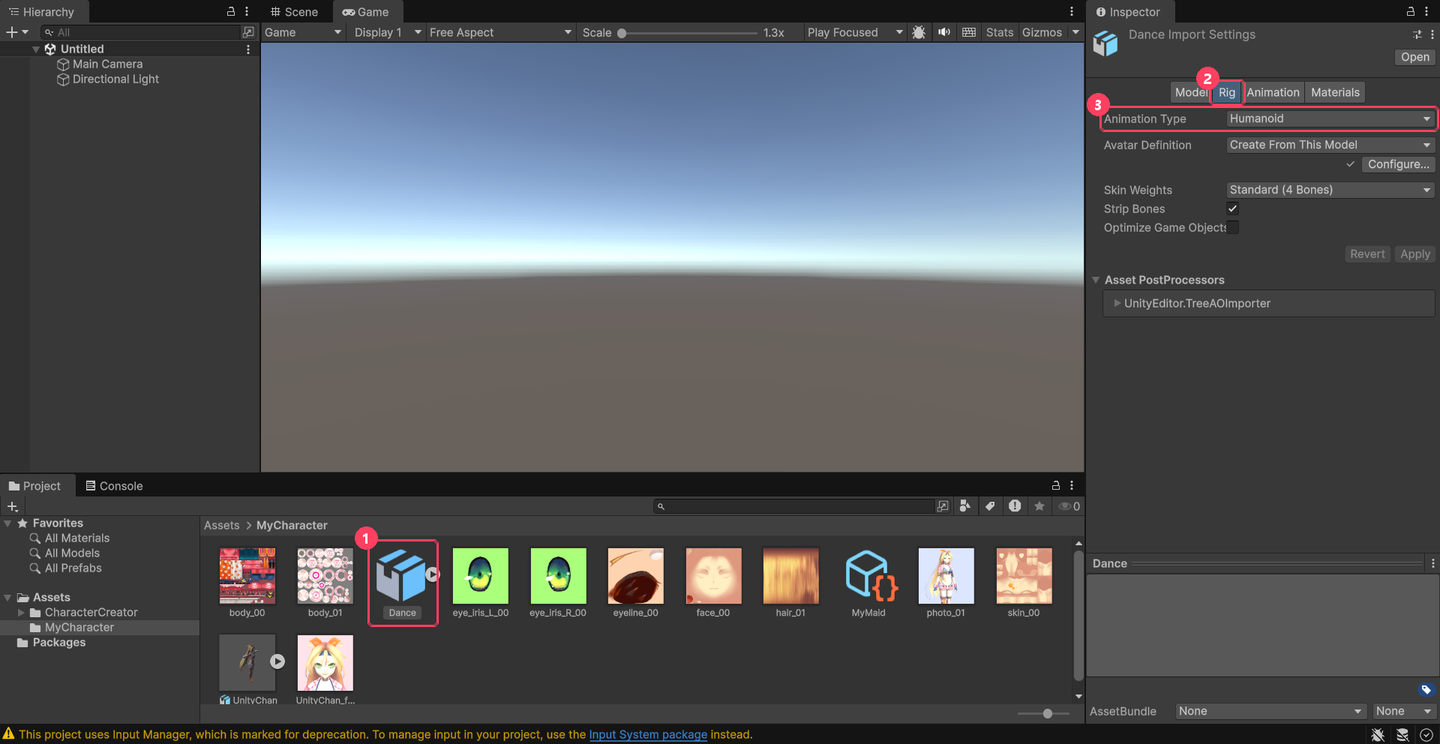
Setting a motion FBX’s Rig to Humanoid
Motion FBX files must be human-shaped too. 1 Click the motion FBX → 2 the Rig tab → 3 set Animation Type to Humanoid and press Apply below
TipThe first message unlocks at Affection 1, the second at Affection 2, and so on. What you write is shown as-is in every language. When you update later, don’t reorder them; add new messages at the end.
10/ 12

Preview

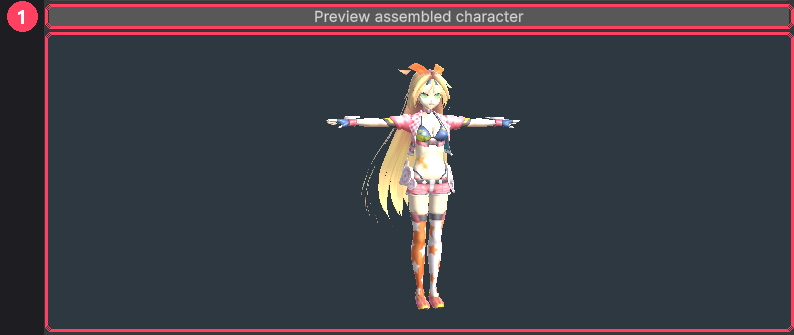
The preview button and the character
1 Press Preview assembled character and she appears below. Check that her colors look right. If she’s white, go back to step 5. In the game she’ll be shown as pixel art.
11/ 12

Check and export

Check character and the Validation passed message
1 Check character → 2 if Validation passed. appears at the bottom, you passed. If another message appears, look it up in If you get stuck.
Export character package and the Exported message
1 Export character package → choose a folder → 2 when the Exported: message appears, you’re done!
12/ 12

See her in the game and upload to the Workshop
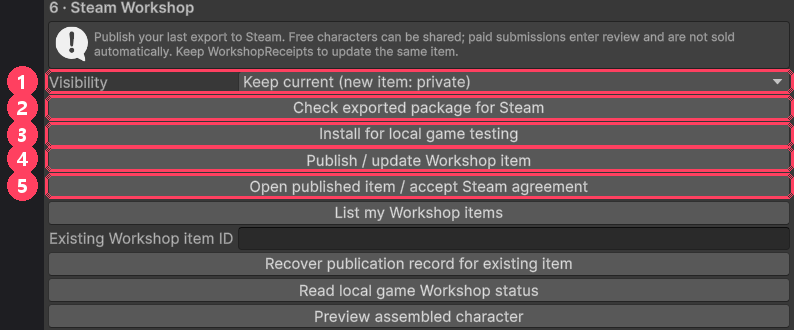
Steam Workshop buttons
1 Visibility · 2 check for Steam · 3 try in my game · 4 upload to the Workshop · 5 open the uploaded page / accept the agreement

First, check in your own game

  1. Press 3 Install for local game testing.
  2. Start the game. Within a few seconds your character shows up in the maid list. If you edited a character while the game was running, restart the game to see the change.

Upload to the Steam Workshop

  1. While signed in to Steam, press 2 Check exported package for Steam. It tells you if the face picture is over 1 MB.
  2. Set 1 Visibility to Private draft (only you can see it) for your first upload.
  3. Press 4 Publish / update Workshop item.
  4. If it says you need to accept the agreement, open the page with 5 Open published item / accept Steam agreement, accept it, then press 4 again.
  5. If everything looks good, change Visibility to Public and press 4 again to share it with everyone.
ImportantDon’t delete the WorkshopReceipts folder that appears in the kit folder. You need it to update the same character later. To update, raise the Revision number in the creator window by 1, export again, then upload.
?Help

If you get stuck

Find the English message shown at the bottom of the creator window below.

If you see this messageDo this
The model needs a valid Humanoid rigDo step 7 again and connect the red bones in Rig → Configure....
A skinned character mesh is requiredThe body isn’t attached to the bones. Add bones with the Mixamo method in “What you need”.
Keep the character below 200,000 verticesThe model is too heavy. Reduce the vertex count in a 3D program.
Textures must be at most 4096 x 4096Resize the texture images to 4096 or smaller.
Choose a square portrait image, up to 1024 x 1024.Make the face picture square and 1024 or smaller.
Height must be 0.8-2.2 m.Change the Height field to a value between 0.8 and 2.2.
Use a model without scripts, colliders or other componentsRemove scripts and colliders from the model.
Animation must be HumanoidSet that motion FBX’s Rig to Humanoid and press Apply (step 9).
Head accessory must be a static mesh prefab.Head accessories must be static models without bones.
Every proactive message requires textDelete the empty message (−) or write some text.
Choose an empty export folder.You already exported this Revision. Raise Revision by 1 and export again.
(no message) My character is whiteDo step 5, Extract the textures.
Steam app/account is not ready.Steam is offline. Signing in to the same Steam account on another PC or program disconnects this one. Fully quit Steam, start it again and sign in, then press Publish / update Workshop item again. If this happens on a first upload, nothing was uploaded, so it is safe to retry.
TipSee-through hair, facial expressions and swaying hair may not look exactly the same in the game yet. Only upload models, pictures and motions made by others if you have the rights to use them.